
Getting Started for Administrators
Your Module Journey
Getting Started
What We'll Cover
1 — What to Look for within 3DEXPERIENCE
2 — Step-by-Step Guide to Activating Cloud Services and Adding Colleagues
3 — Setting Up for Success
4 — Migrating Content
Get Started as an Admin
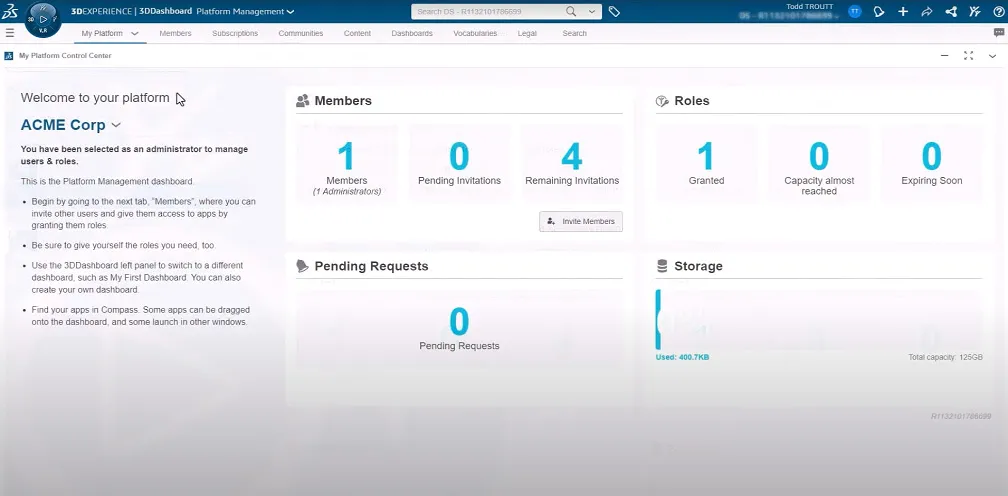
Overview: Understanding Your Role as Administrator
The 3DEXPERIENCE platform
Understanding Your Role as a Platform Admin
First Steps as a Cloud Services Administrator
So maybe you’ve decided to embrace the elephant and give Cloud Services a try. We’re thrilled to hear it. The first step is to activate and install a couple things.

The steps you’ll take are different, depending on whether you’re the primary Administrator (the first or only user from your organization to sign up) or a Member (everyone else).
Please note: The primary Administrator can assign others as Administrators in the dashboard.
Important
If you are the admin and first user, follow the First Steps as a Cloud Services Administrator below.

Are you not the admin of your account?
Hop over to the member journey
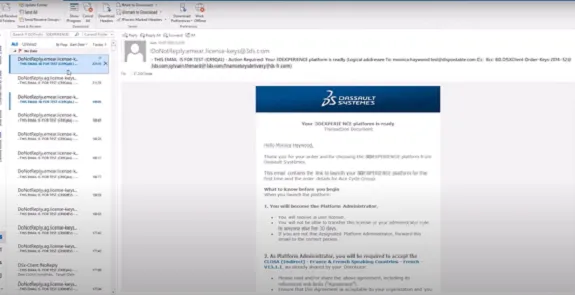
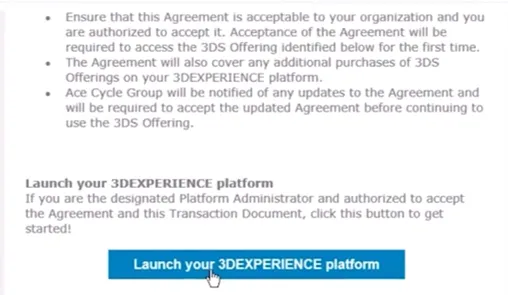
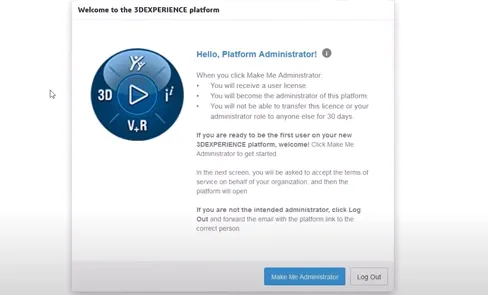
Step 1: Activating Cloud Services – First or Only User
If you’re going to be the 3DEXPERIENCE platform Administrator for your organization, this section is for you. Please note that going through these steps will consume one of your available licenses.

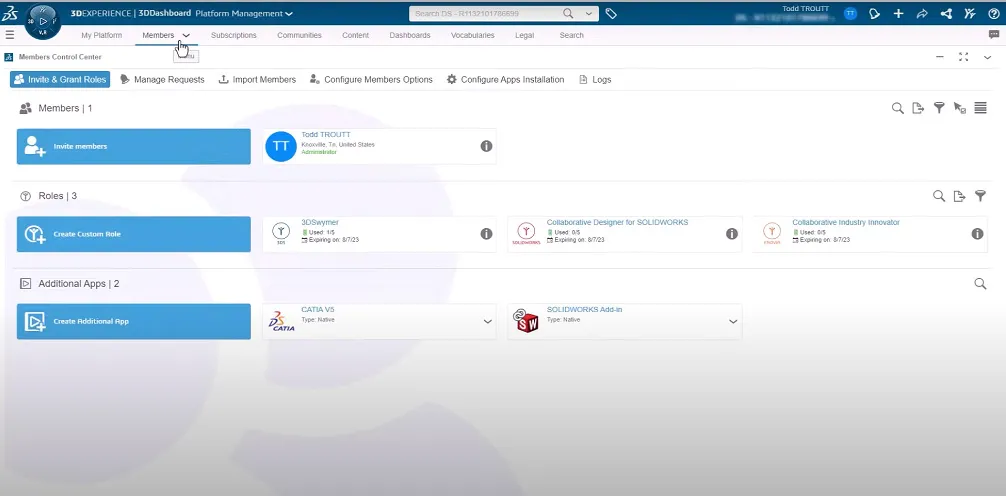
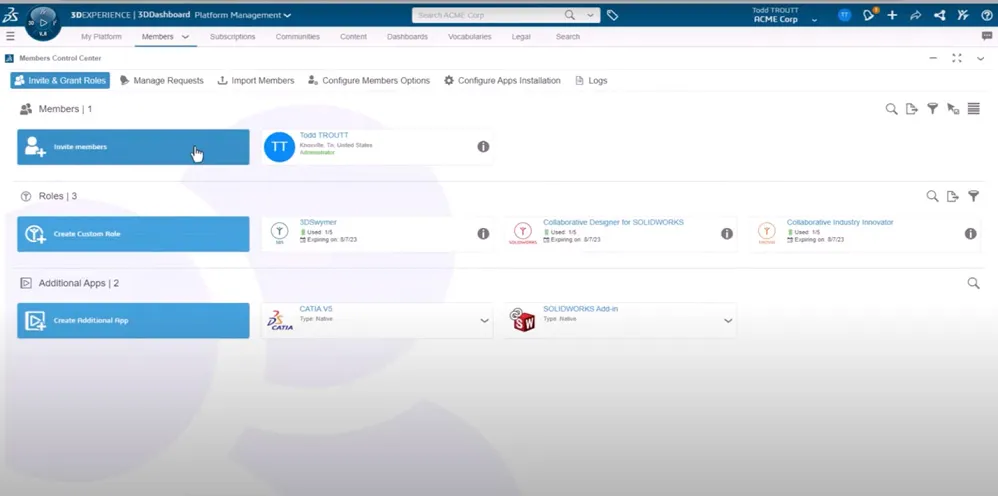
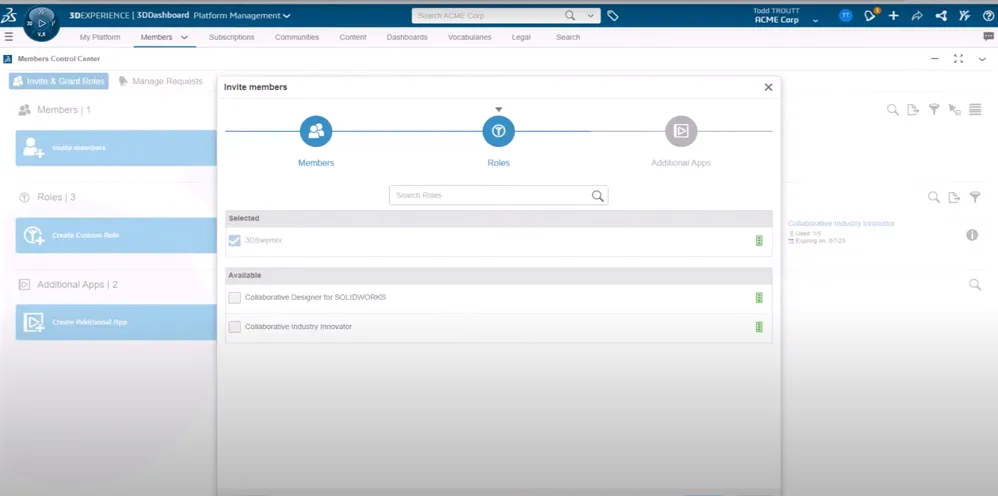
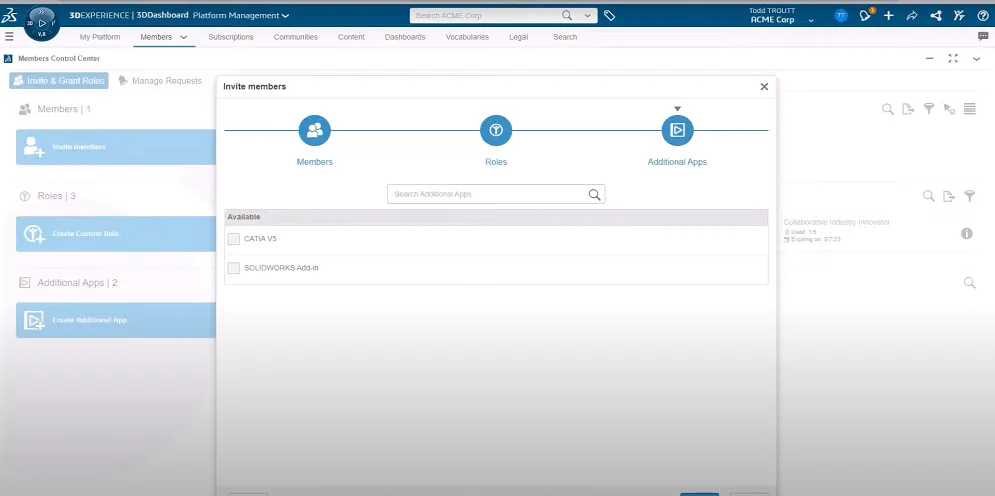
Step 2: Adding Your Colleagues to Cloud Services
If you’ve purchased multiple licenses that include Cloud Services, you can now add colleagues in order to share and access files together. Here’s how to do it:
Step 3: Installing the software
Follow the steps in this video to install Design with SOLIDWORKS. Cloud Services requires the installation of the Design with SOLIDWORKS app that is part of the Collaborative Designer for SOLIDWORKS role. Follow the steps in this video to install Design with SOLIDWORKS.
Collaborative Designer for SOLIDWORKS
Installing the Design with SOLIDWORKS app
How To and Best Practices
Setting Up for Success as an Administrator
Your account is now activated, you’ve invited some team members (if applicable), and you’ve installed SOLIDWORKS Connected to get up and running with Cloud Services. For both new and existing users, you’ll want to start by creating a place to store design data using Collaborative Spaces. Now there are a few more steps to take to configure the environment for seamless collaboration and management:
Steps to Take for Existing Users:
- Migrate Existing SOLIDWORKS Design Content to the 3DEXPERIENCE platform
- Configure the Open and Save Behavior for Users
- Store SOLIDWORKS Templates in 3DEXPERIENCE
- Map attributes to sync your SOLIDWORKS properties to the 3DEXPERIENCE platform
- Configure your SOLIDWORKS Design Library for 3DEXPERIENCE
- Configure the SOLIDWORKS Toolbox for 3DEXPERIENCE
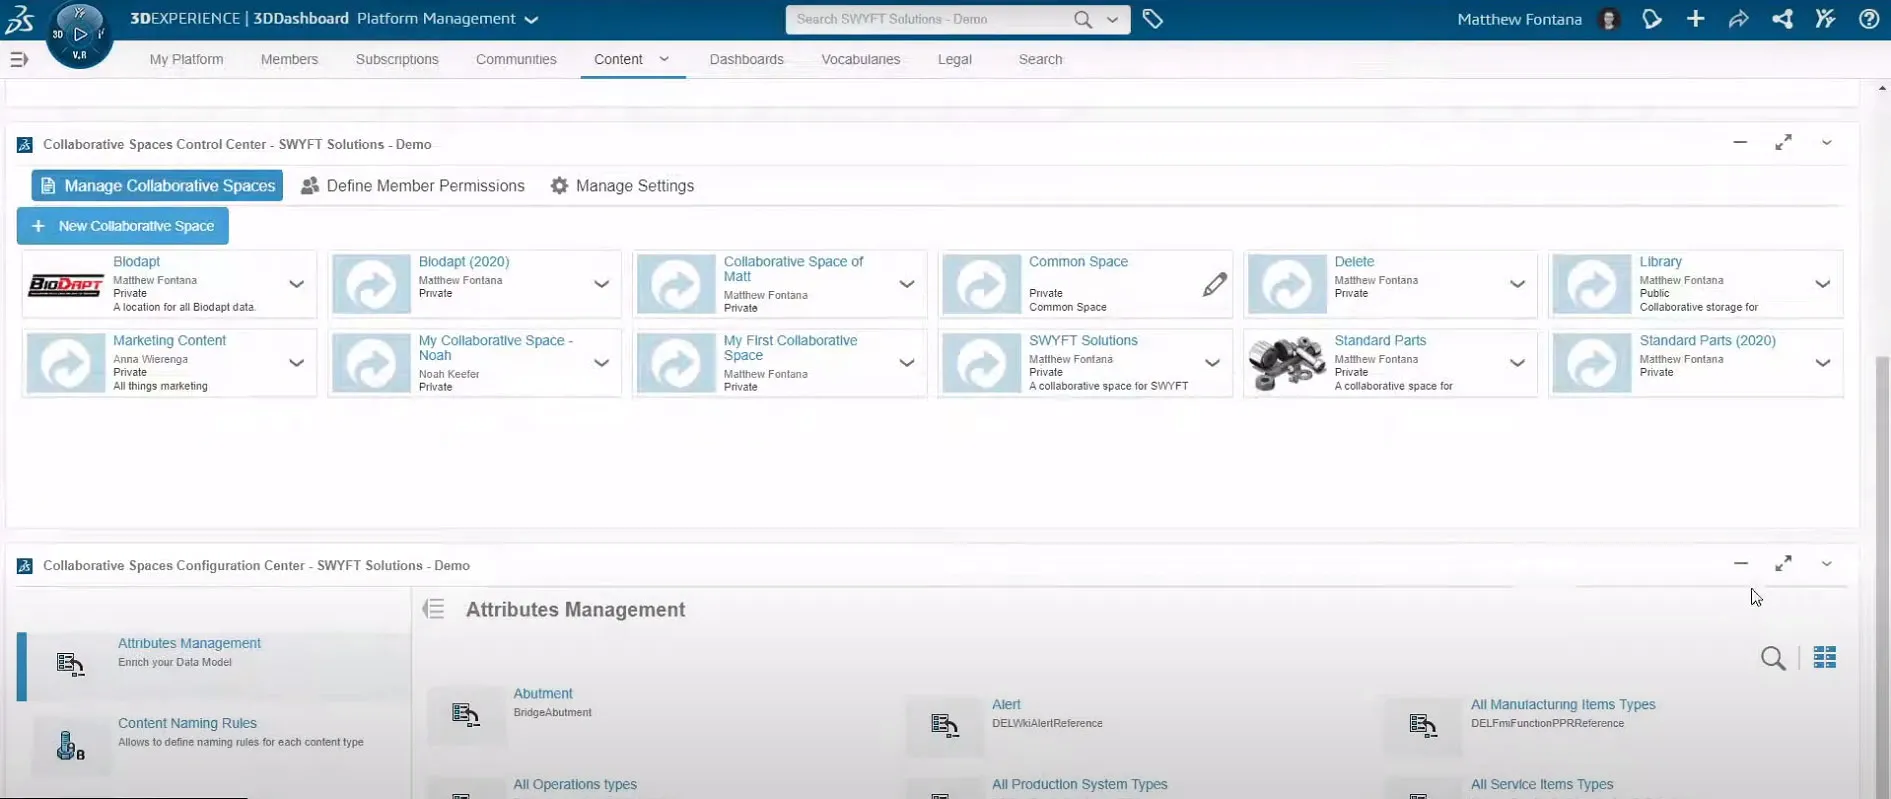
Create a Place for Storing Design Data
The 3DEXPERIENCE platform
Create a Place to Store Your 3D Data using Collaborative Spaces
This video will teach you:
1. What Collaborative Space is on the 3DEXPERIENCE platform
2. How to create a new Collaborative Space to share content
3. How to add members and assign corresponding permissions to your Collaborative Spaces
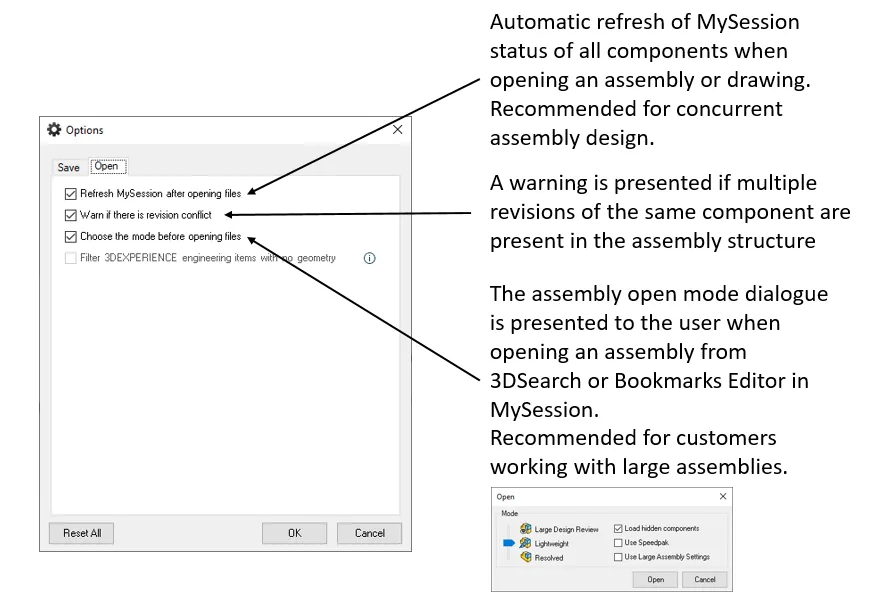
Configure Each User’s SOLIDWORKS MySession Settings for Open and Save Behavior
When teams of users are working together on the same project, it’s important that the open and save settings are consistent across all workstations to avoid unexpected behaviour.
The SOLIDWORKS MySession settings provide the ability to configure the open and save behaviour on each user’s workstation. In order for you to have the best experience, it’s important that users understand these options and how they affect the behaviour of SOLIDWORKS.
The MySession options are located on the Tools tab of the MySession toolbar.

The following two graphics provide an explanation of the recommended MySession option settings.
Open Options
Save Options
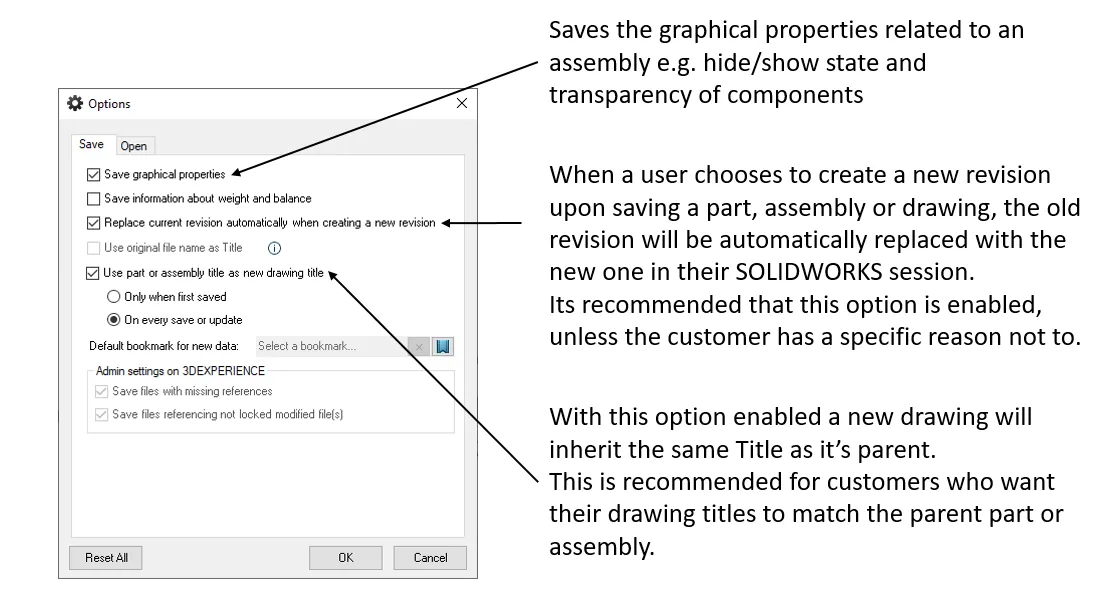
For more information related to the MySession options, please refer to the 3DEXPERIENCE online documentation: Options Dialog Box in the Tool Tab.
Storing SOLIDWORKS Templates in the 3DEXPERIENCE platform
SOLIDWORKS templates enable all users at a company to work together using consistent SOLIDWORKS settings and defined drawing standards. If you’re an existing SOLIDWORKS customer adopting 3DEXPERIENCE, storing templates in the platform will allow you to maintain consistency of settings and standards—with some added benefits.
Storing SOLIDWORKS templates in 3DEXPERIENCE gives you control over who can modify and delete templates. This is important for companies that are:
- Operating in tightly regulated industries where drawings have to adhere to strict standards
- Working concurrently on large assemblies where having consistent settings across all users will enable everyone to work in the most efficient way
Storing and managing SOLIDWORKS templates in 3DEXPERIENCE provides the additional benefit of lowering administrative overhead. Templates don’t need to be backed up from a server, and any modifications can be immediately made available to all your users, which can be a big benefit regardless of your company size.

The process of uploading Part, Assembly, or Drawing templates is the same as uploading a regular SOLIDWORKS file. When opened in SOLIDWORKS, a template is saved to a Collaborative Space using the MySession save.
However, there are a few subtle differences. Templates are recognized as their own object type—XCAD Template. During the save, the user is offered the option of either creating the template in the Released maturity state, making it available to all users, or in the Private maturity state, where it will only be accessible to the person saving it. Any templates saved in the Private state can always be promoted later to Released if required.
Once saved to 3DEXPERIENCE, templates can be revised and modified. Who can make a modification and when will depend on a user’s Collaborative Space permissions, as well as the maturity state of the template. Templates can be deleted from a Collaborative Space using either the 3DSearch, Bookmarks Editor, or Collaborative Lifecycle widgets.
For more information and guidance on this topic please refer to the 3DEXPERIENCE SolidPractices guide Storing Templates.
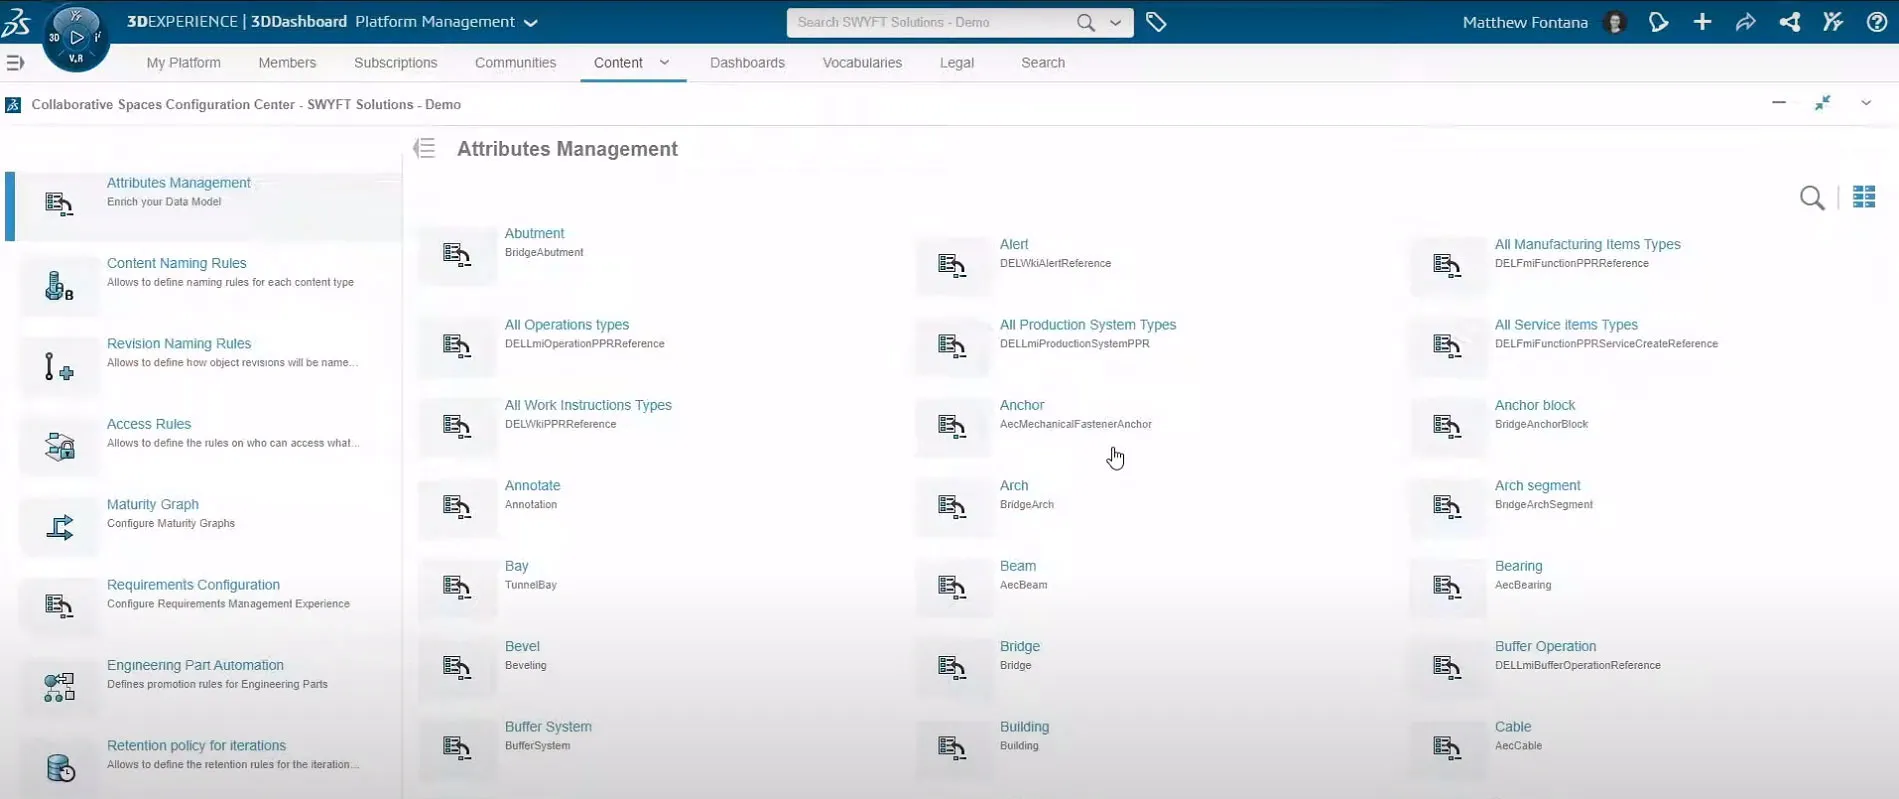
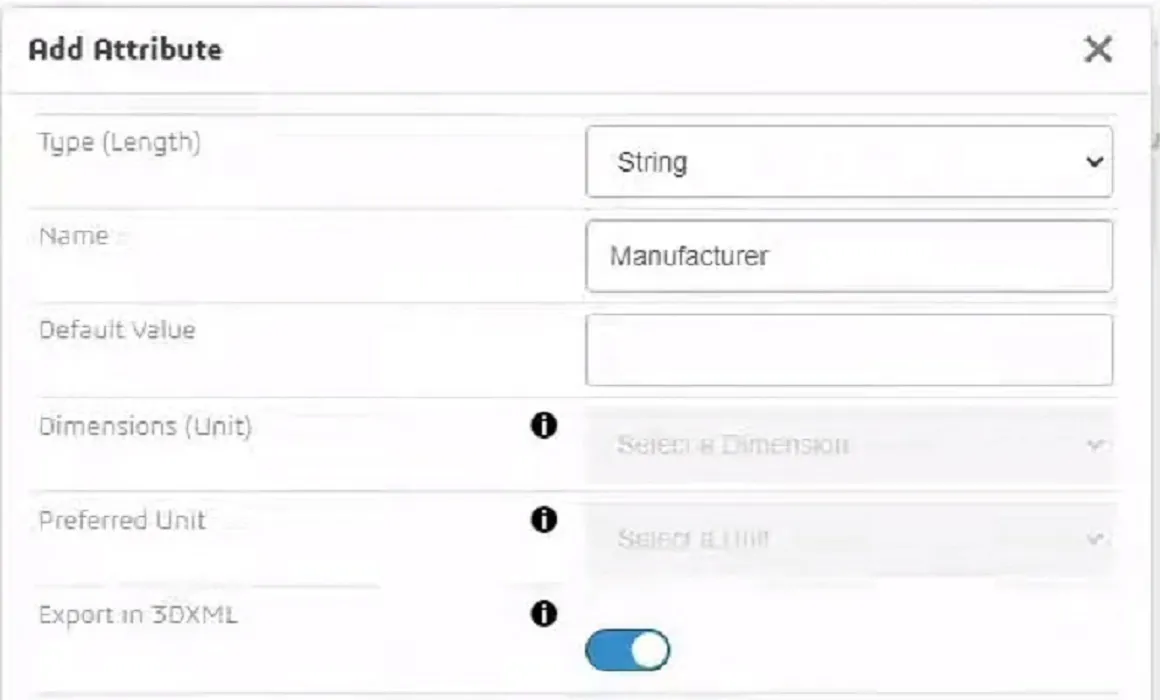
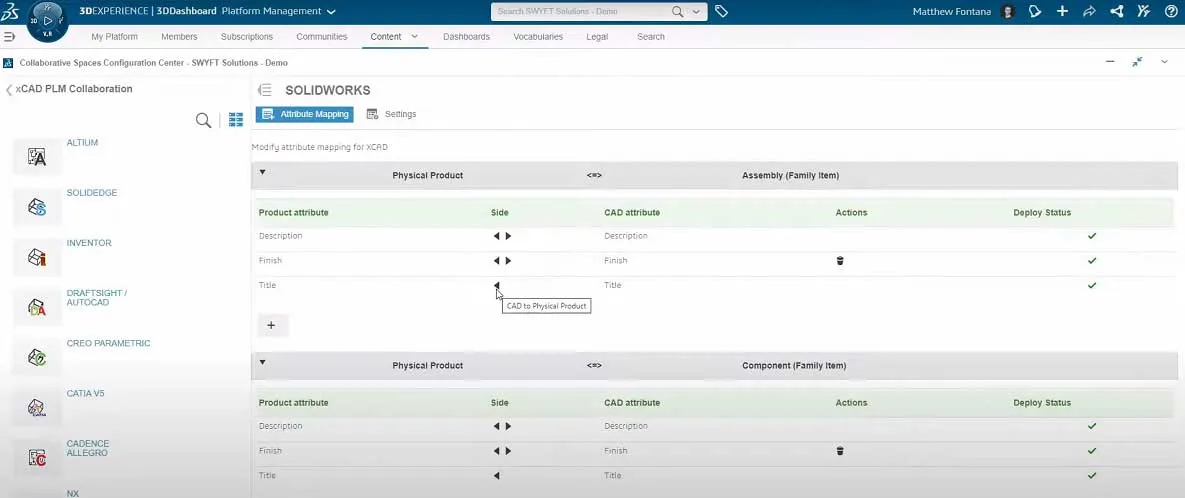
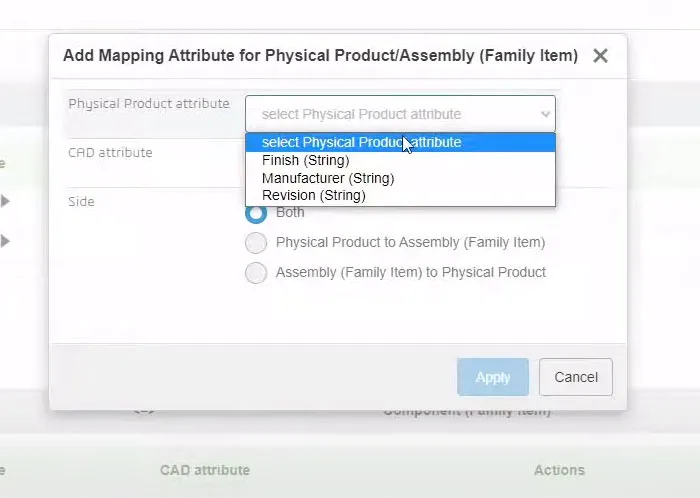
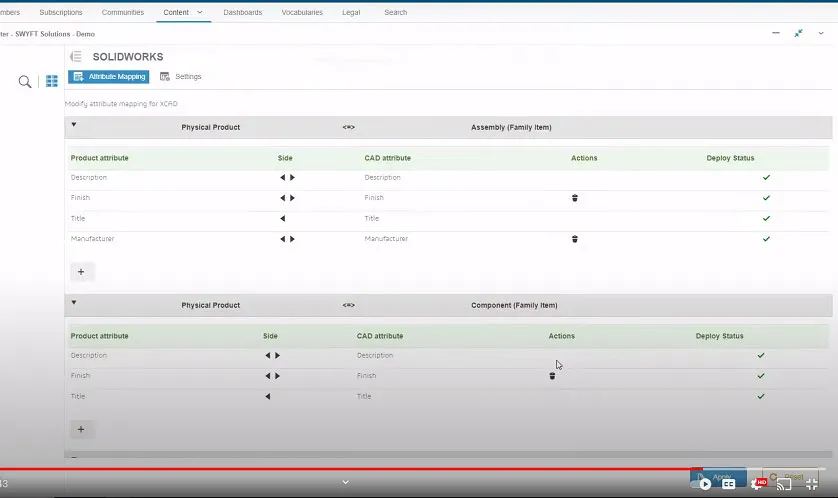
Map Attributes to SOLIDWORKS Properties
If you’re an experienced SOLIDWORKS user, you’re probably familiar with using “properties” that are associated with SOLIDWORKS parts. The 3DEXPERIENCE platform uses its own properties, known as attributes.
When you upload SOLIDWORKS parts to the cloud, most of these properties will not be linked to 3DEXPERIENCE attributes. That’s why you’ll need to use attribute mapping to set up a monodirectional or bidirectional link between your SOLIDWORKS properties and your 3DEXPERIENCE attributes.
It’s important to map attributes either before Members begin using Cloud Services or during a time when no Members are actively using the software (e.g., nights or weekends).
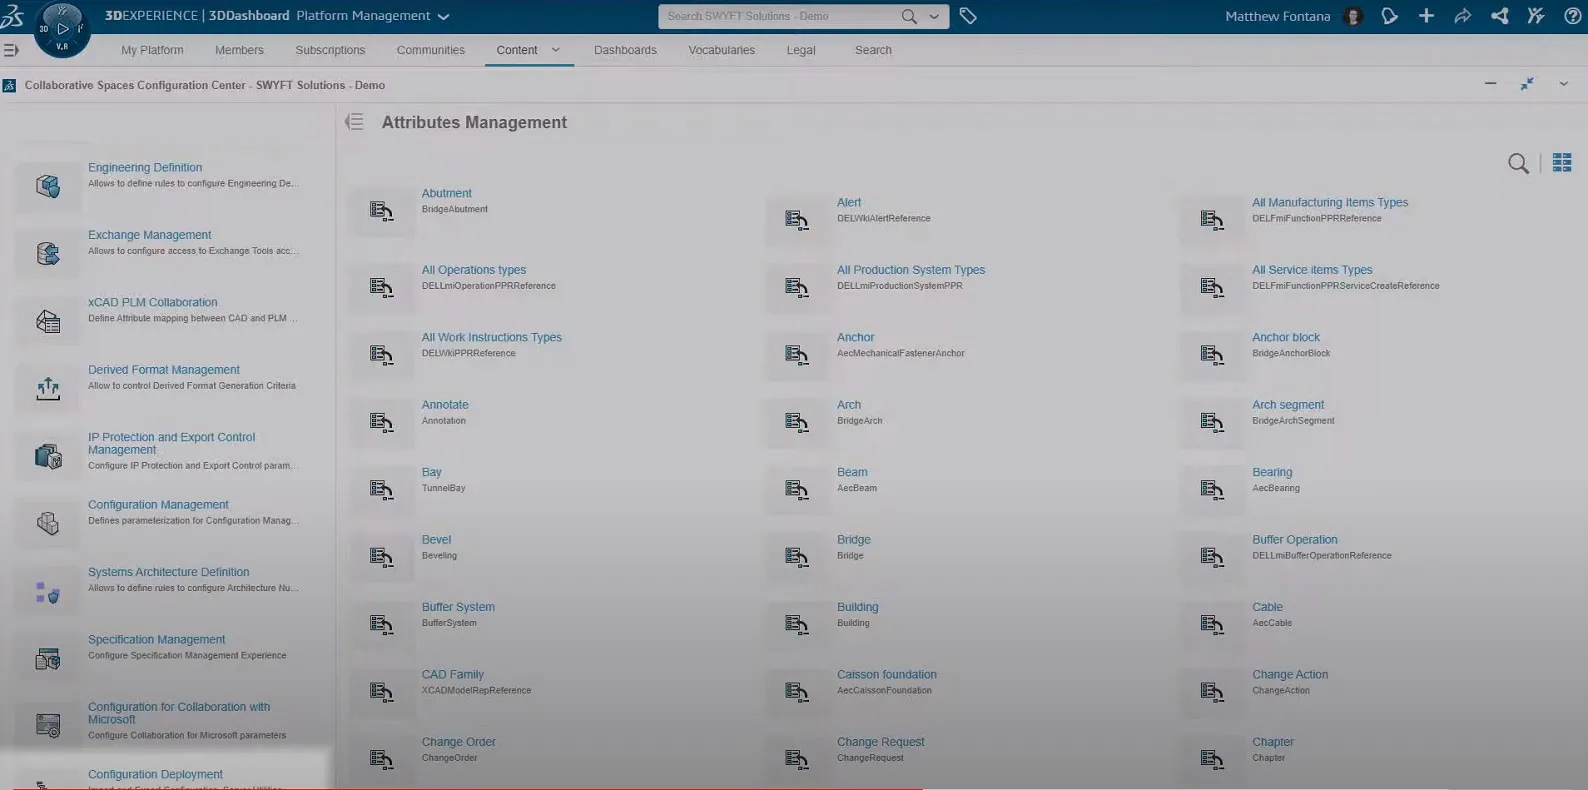
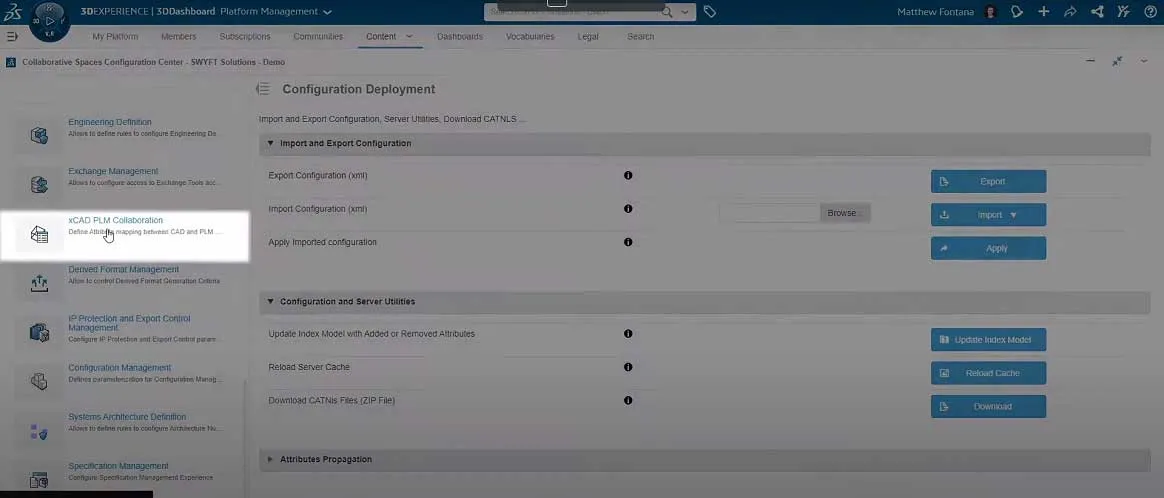
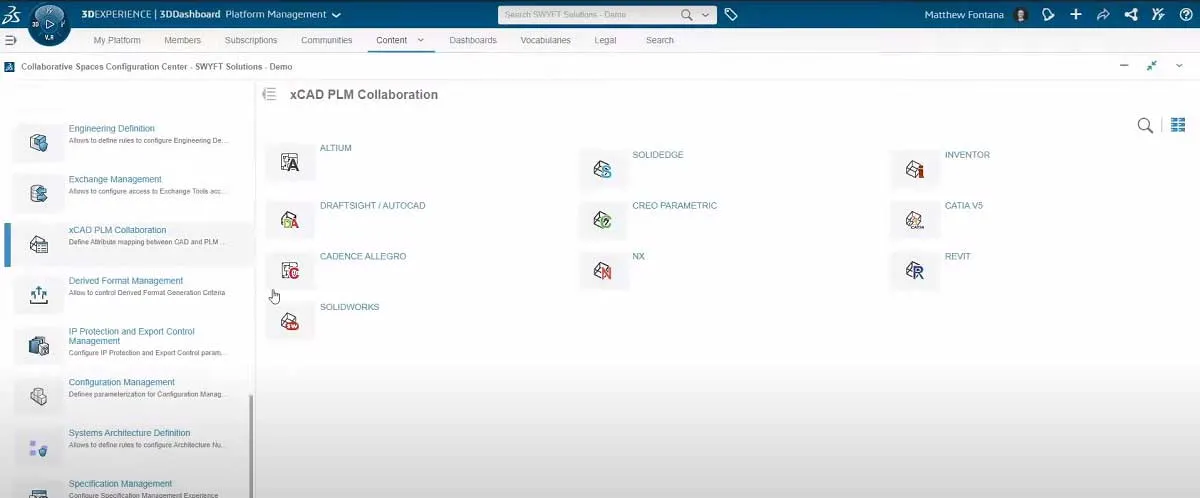
1. Access the Collaborative Spaces Configuration Center
2. Access the Physical Product Attribute
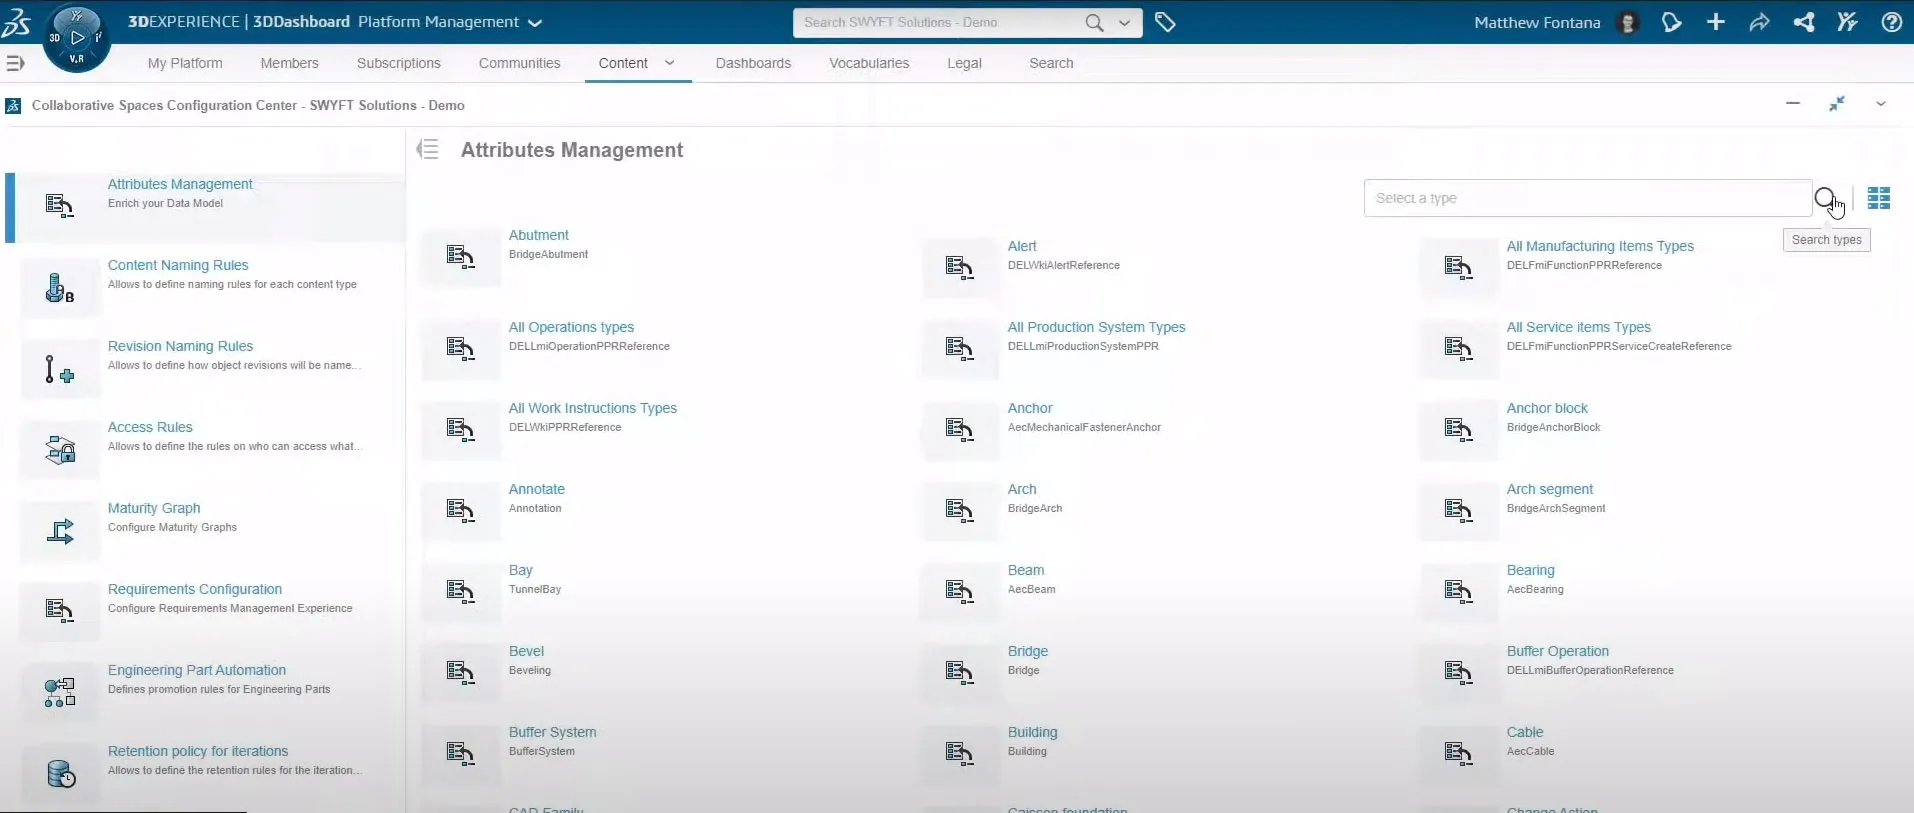
3. Add Your Attributes to Physical Products
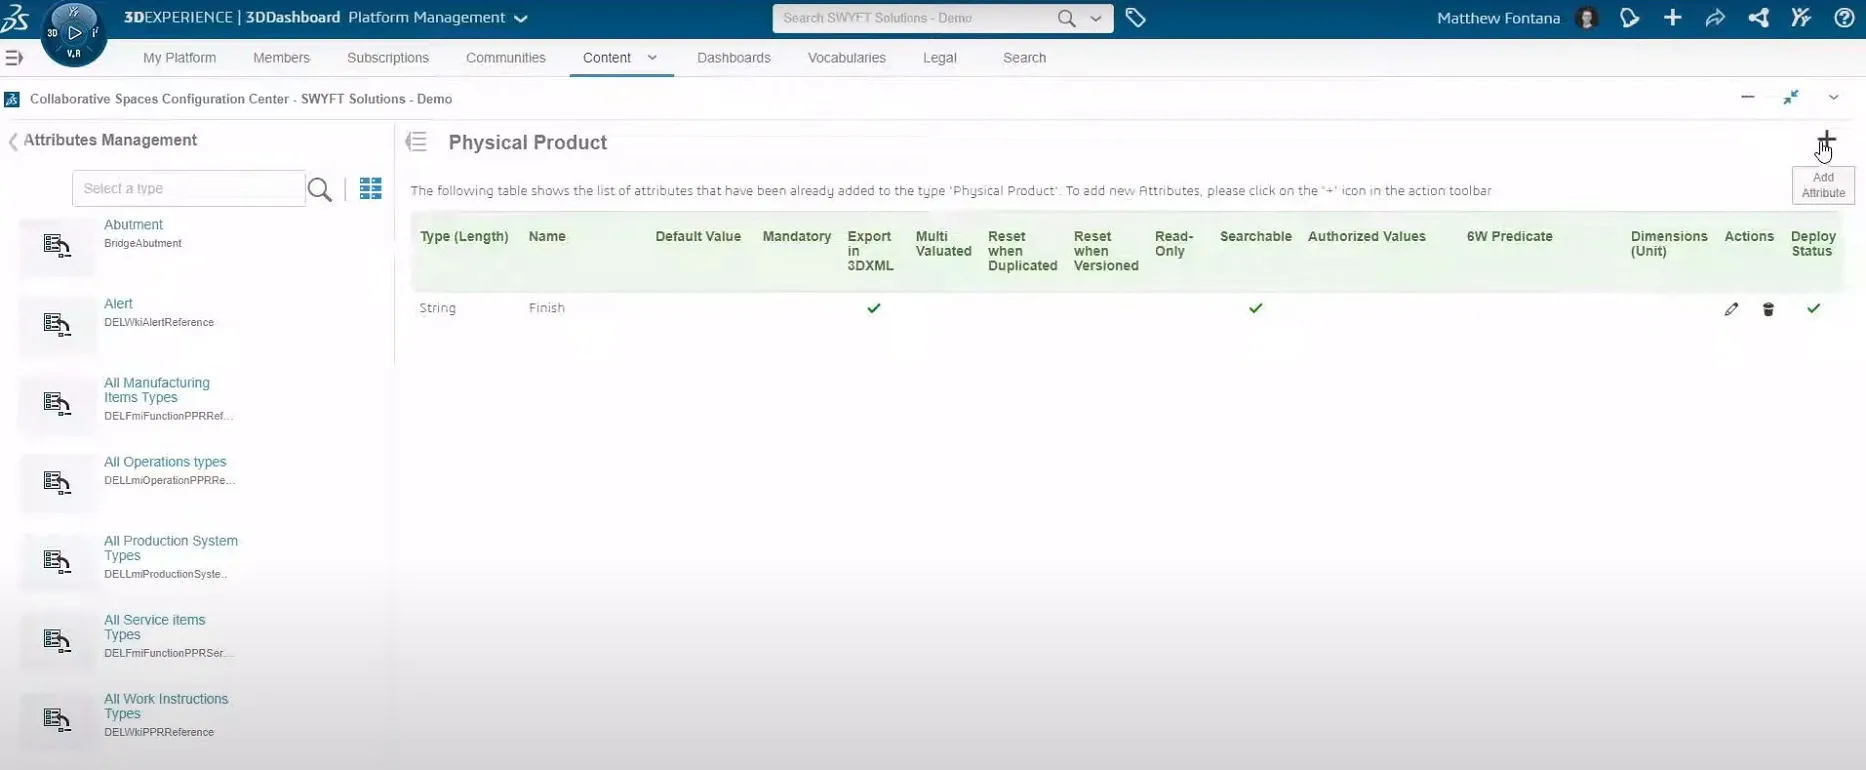
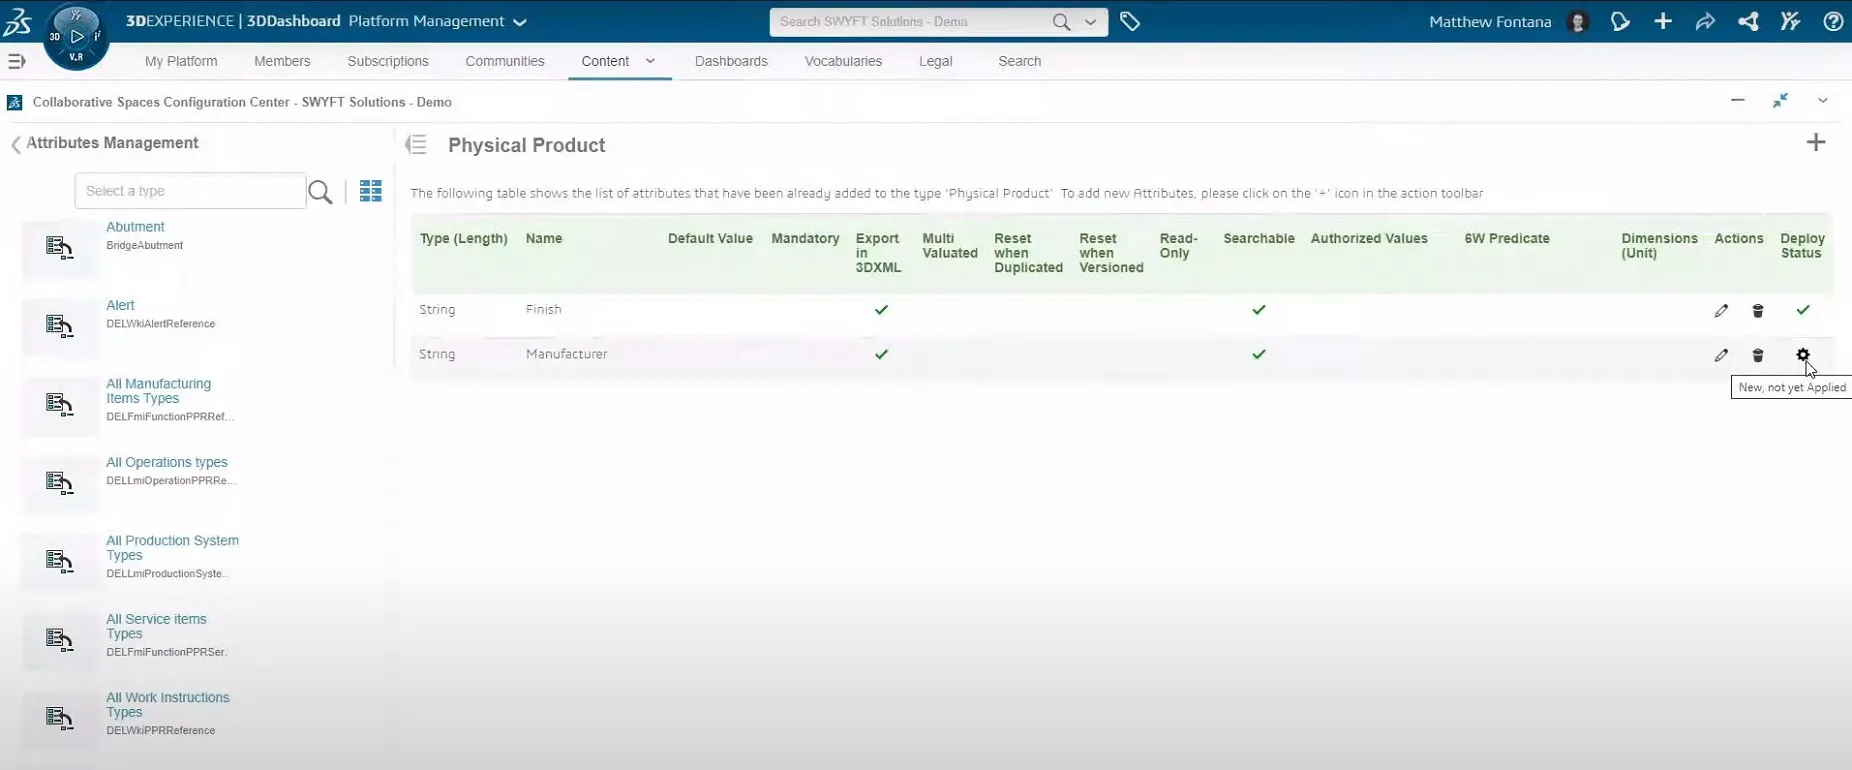
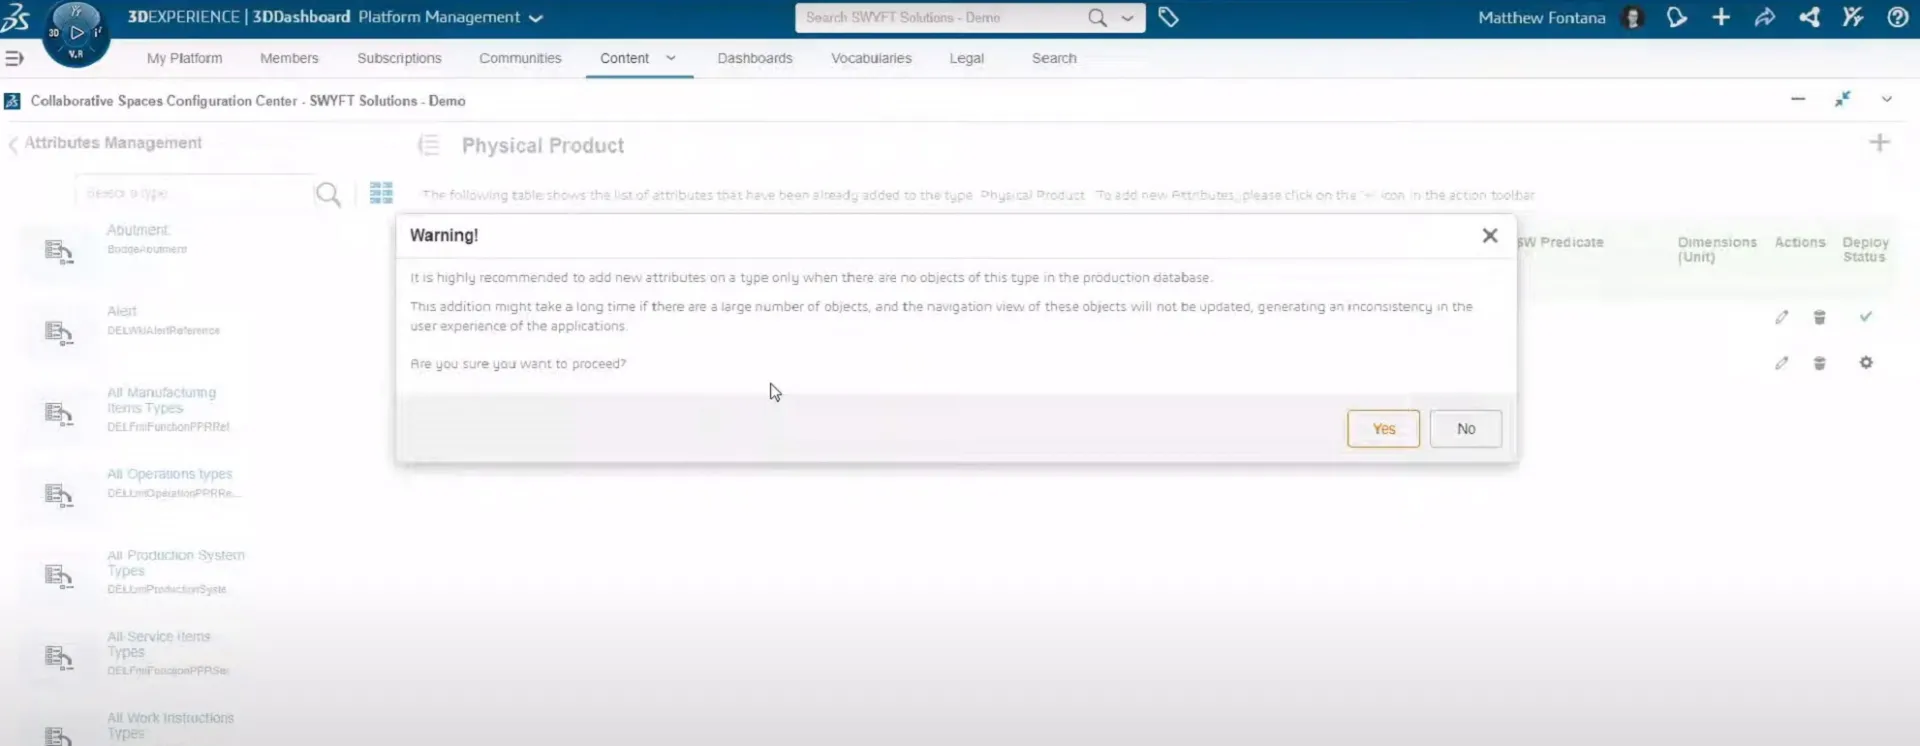
4. Reload the Server Cache and Update the Index Model
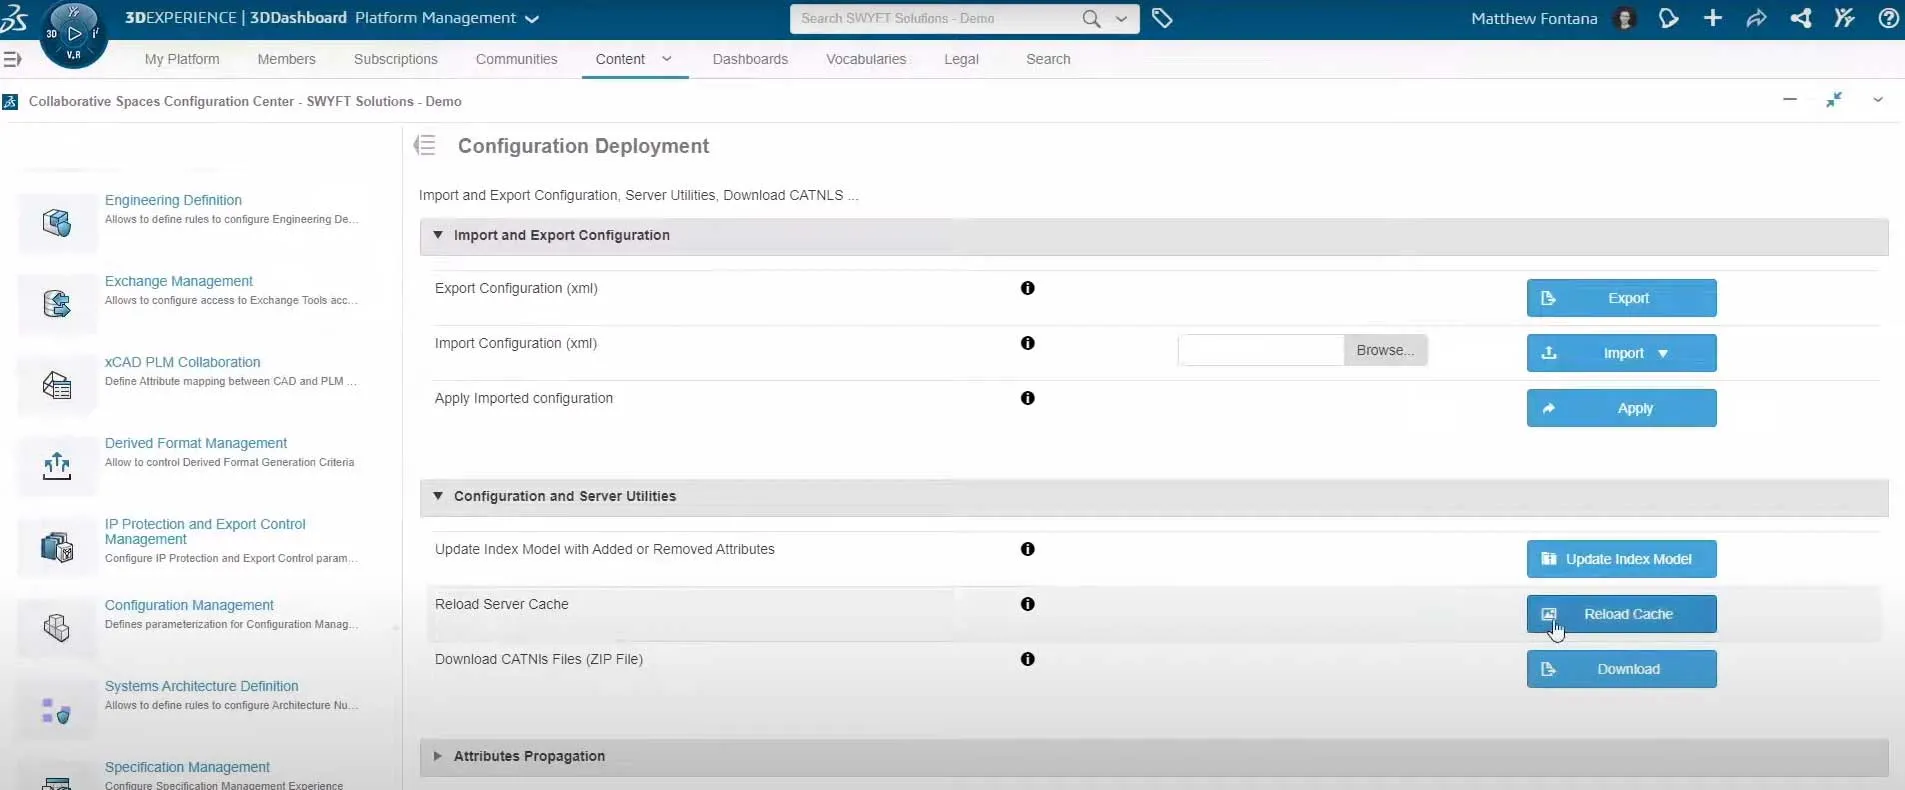
5. Map Your Attributes to SOLIDWORKS
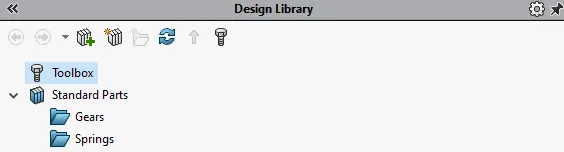
Configuring the SOLIDWORKS Design Library for the 3DEXPERIENCE platform
The SOLIDWORKS Design Library tab in the SOLIDWORKS Task Pane provides a central location for reusable design elements such as parts, assemblies, and sketches. Traditionally, the Design Library displays sub-folders and their contents located on a local or network drive.
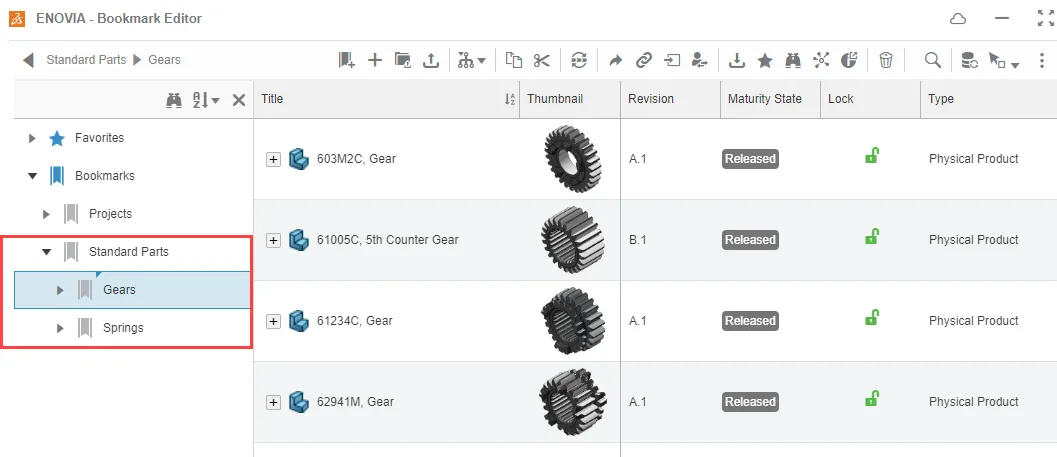
When you’re adopting 3DEXPERIENCE, you can store your Design Library parts and assemblies in a Collaborative Space and organize them using a Bookmark structure. This is called a Connected Design Library and is displayed in the Task Pane with a blue library icon. See Store & Revise: Using Bookmarks for more info.
Bookmarked parts and assemblies appear in a Connected Design Library as a hierarchy (similar to a local folder structure) and can be downloaded to a local workstation on demand.
To create a Connected Design Library, first upload the desired library parts and assemblies to a Collaborative Space, and organize them in a Bookmark structure. If the local files are currently organized in the desired folder structure, then it is recommended that the Batch Save to 3DEXPERIENCE Utility is used to upload the files replicating the existing folder structure as Bookmarks.
To avoid users unintentionally modifying the Design Library items, it is recommended that after the upload, the library items are promoted from “In Work” to the “Released” state if no further modifications (geometry, attributes etc.) are required.
Once the upload is finished and items are organized in a Bookmark structure, to add a connected Design Library, do one of the following:
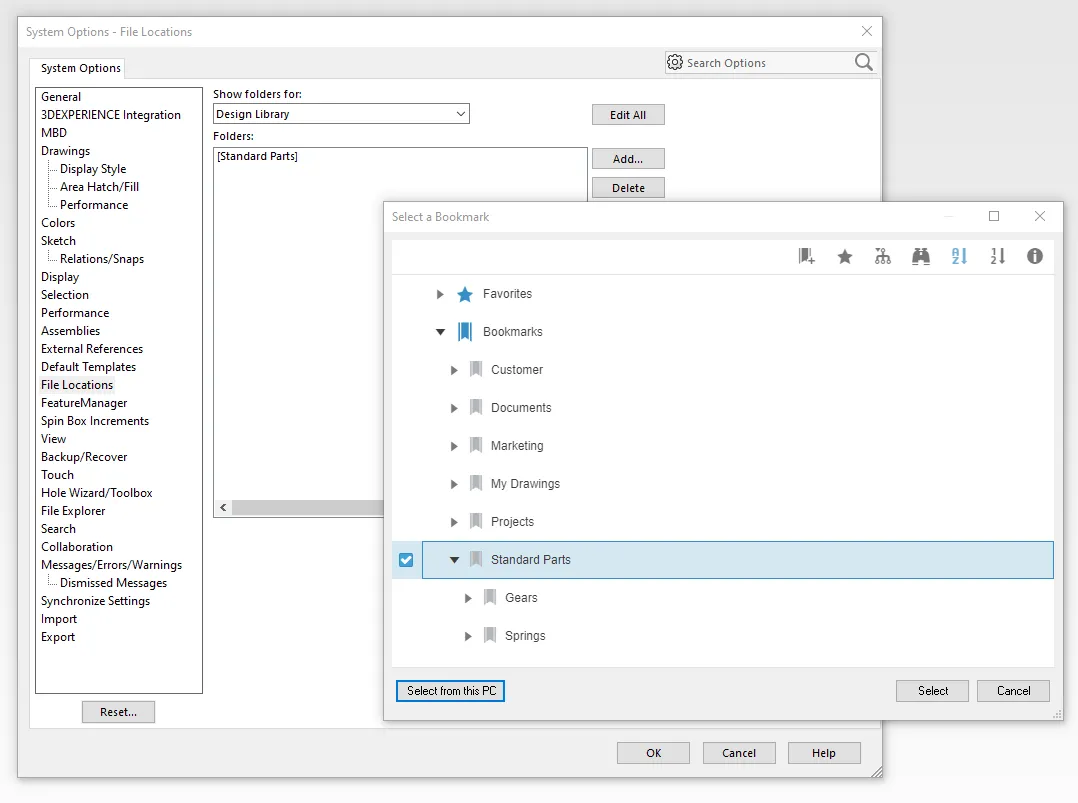
- In the Task Pane, on the Design Library tab, click Add File Location.
- In SOLIDWORKS Options > File Locations, show folders for Design Library and click Add.
In the Choose Folder dialogue box, click Select from 3DEXPERIENCE.
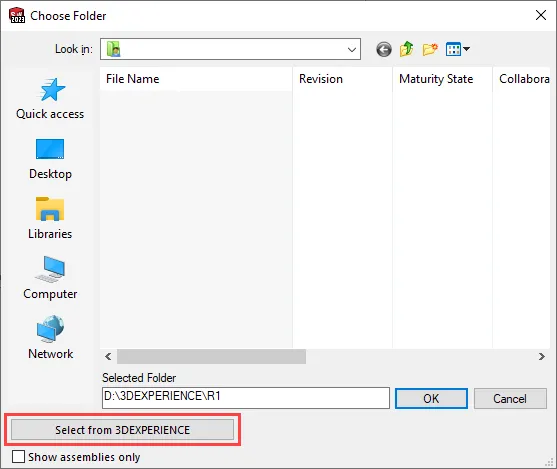
Next, select a Bookmark to add to the library.
The Bookmark hierarchy appears in the Design Library as a Connected Design Library with a blue icon, ready to use.
Managing Design Library Content
If your organization is required to manage extensive component libraries, it’s recommended that you create a dedicated Collaborative Space for this purpose and assign a dedicated group of users to manage it. Consider the Visibility type of the Collaborative Space used to manage the library components, as each setting—Private or Protected—will impact who in the company has access to the content.
Using a “Protected” Collaborative Space type provides a simple method of restricting the access to Design Library components while in the In Work maturity state.
Configuring SOLIDWORKS Toolbox for the 3DEXPERIENCE platform
If you’re currently using SOLIDWORKS Professional and Premium, you are most likely utilizing Toolbox for your standard parts library.
The Toolbox component library can be fully managed using 3DEXPERIENCE, so it’s important to have a complete understanding of how to use it in the context of 3DEXPERIENCE.
General Recommendations for Configuring 3DEXPERIENCE and Toolbox
Before uploading Toolbox parts to 3DEXPERIENCE, you can configure the default Collaborative Space and initial maturity state of uploaded Toolbox components from the Standard Libraries Management area of the Collaborative Spaces Configuration Center.

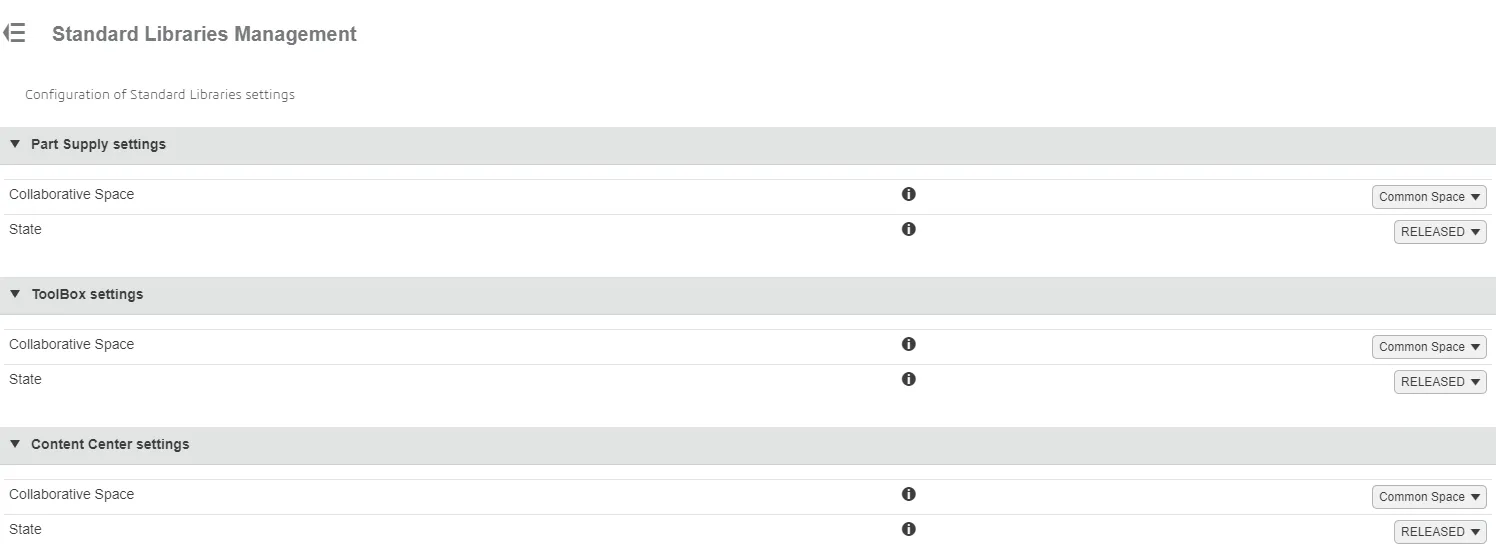
By default, the Collaborative Space for Toolbox components in a new 3DEXPERIENCE Tenant is set to Common Space. This will most likely meet your needs.
However, if you want to control who can access Toolbox content and when, it is recommended that you create and use a dedicated Public Collaborative Space instead. If you start out using the Common Space Collaborative Space but later decide you need more access control, the existing Toolbox components can be moved from the Common Space to another space. However, be aware that if the target Collaborative Space has a different security context (e.g., Public versus Private), it will restrict some users’ access to the Toolbox components.
All uploaded Toolbox components by default are automatically promoted to the Released maturity state. While this prevents SOLIDWORKS users from modifying these components, it also restricts the ability of an Administrator or library manager to edit the components and add additional information (e.g. an Enterprise Item Number).
If Toolbox components need to be edited before being made available to the wider design team, then it’s recommended that the default Maturity state be set to In Work. When in the In Work state, Toolbox components can be modified and then promoted to the Released state as a separate operation.
For a comprehensive overview with recommended best practices, please refer to the SolidPractices guide titled Working with Toolbox.
Recommendations and Strategies for Using SOLIDWORKS Configurations
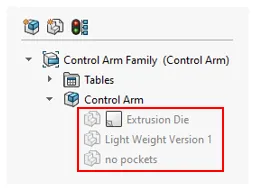
Before starting any new design project, it’s important to choose the right strategy for working with SOLIDWORKS configurations. Otherwise, you might end up with the creation of unwanted and unnecessary linked Physical Products when saving new parts and assemblies.
Taking the right approach will enable you and your design teams to maximize the benefits of working with Cloud Services right from the start.
Prototype and Production Parts and Assemblies
It’s recommended that parts and assemblies designed and developed in house for production should only have one SOLIDWORKS configuration converted to a Physical Product saved to 3DEXPERIENCE. This SOLIDWORKS configuration should be configured to contain any key SOLIDWORKS properties related to engineering and manufacture.
The resulting Physical Product in 3DEXPERIENCE will represent a single engineering definition for that part and assembly including the maturity state, Enterprise Item Number, plus any Physical Product specific attributes.
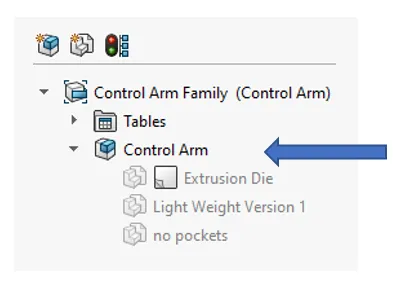
There will still be use cases where additional configurations are required to aid design in SOLIDWORKS. These should be created as representation configurations so that Physical Products are not created when saving the file to 3DEXPERIENCE.
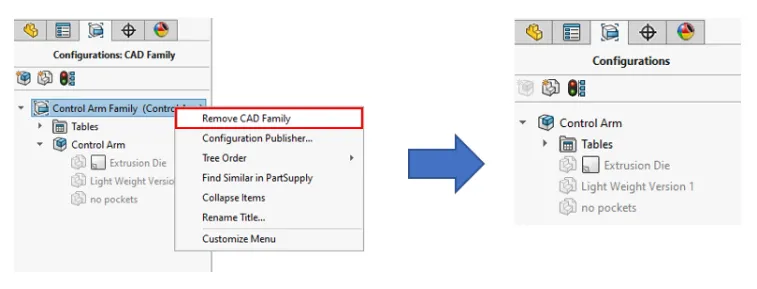
In order to manage the two different configuration types, the SOLIDWORKS option “Update SOLIDWORKS files for compatibility with the 3DEXPERIENCE platform” should be enabled for all users.
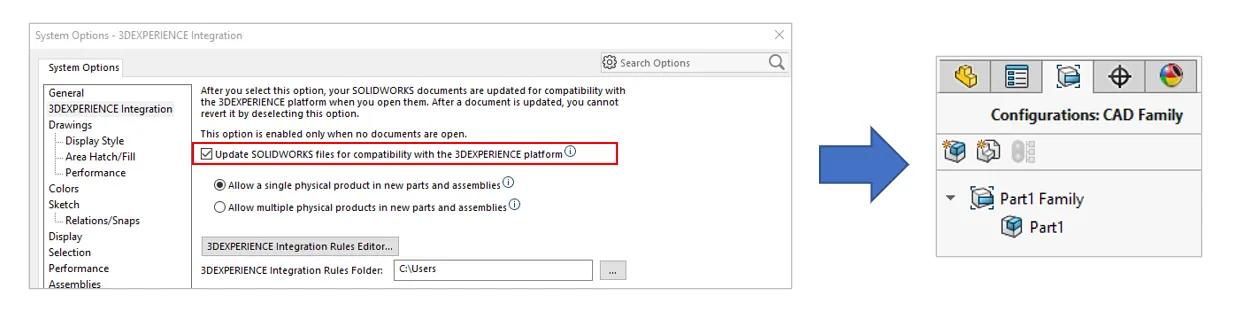
For companies using SOLIDWORKS 2024, it’s recommended that the Remove CAD Family option is utilized so that only one Physical Product configuration can exist per file. Any additional SOLIDWORKS configurations will be automatically created as Representation configurations. It’s also recommended that SOLIDWORKS part and assembly templates are updated with the CAD Family removed to make this the default behavior for every new part and assembly file, or enable the 3DEXPERIENCE Integration SOLIDWORKS system option “Allow a single physical product in new parts and assemblies.”
For companies using SOLIDWORKS 2023 or earlier, users will have to manually choose which SOLIDWORKS configuration to nominate as the Physical Product configuration. It is not possible for the platform administrator to configure 3DEXPERIENCE to force this to be the default behavior. Therefore, it’s important that users are well trained and have a complete understanding of the recommended working practices detailed in this section of the guide.
Standard Library and Purchased Parts and Assemblies
Externally purchased parts and assemblies can be treated differently to components designed in-house. Typically purchased items are managed in a library and are not modified or revised by the engineers utilizing them in their designs.
When deciding which SOLIDWORKS configuration strategy to take with purchased parts, please consider the following:
SOLIDWORKS part files with configurations that represent different size variations
- If there are 20 or fewer size configurations per part file, you can use Physical Product configurations without negatively affecting SOLIDWORKS performance.
- If you have greater than 20 configurations per part file, it’s recommended that a single Physical Product configuration per file strategy is deployed to maximize SOLIDWORKS performance. Each individual size configuration will need to be saved out to its own individual part file.
Note: In this scenario Representation configurations must not be used to represent different size variations. Representation configurations are not saved to 3DEXPERIENCE, therefore the size variation of the part will not be displayed in any of the 3DEXPERIENCE viewer widgets.
SOLIDWORKS assembly files with configurations
- For all assembly files, it’s recommended that you deploy a single Physical Product configuration per file strategy. Each individual size configuration will need to be saved out to its own individual assembly file.
When deciding on which configuration strategy to deploy for SOLIDWORKS library parts, it’s important to ensure that the user experience is kept consistent. Keep to one strategy, and avoid having a mix of single and multiple Physical Product library parts.
For an in-depth overview and detailed best practices, please refer to the SolidPractices guide titled Using SOLIDWORKS Configurations with the 3DEXPERIENCE Platform.
Need additional guidance on configuring your account for Cloud Services? Don't hesitate to contact your SOLIDWORKS reseller.
Migrating Existing SOLIDWORKS Design Content to the 3DEXPERIENCE platform
If you’re an existing SOLIDWORKS customer adopting Cloud Services, you will likely want to migrate some of your existing design content to 3DEXPERIENCE. There are a few ways to approach this—and a few things you need to know in advance.
It’s important to understand that the 3DEXPERIENCE platform is not an archiving solution. Attempting to move every SOLIDWORKS design going back years will use up your platform storage allowance. Instead, consider moving only your current projects and component libraries.
The following sections provide high-level guidance on what tools are available to help you with this migration.
Preparation and Planning
Before moving any pre-existing SOLIDWORKS content to 3DEXPERIENCE, it’s important to ensure good data integrity. Using Windows File Explorer to manage SOLIDWORKS CAD files is typically an unstructured, manual process, and the current quality of the file set may mean it’s not yet ready for a move to the 3DEXPERIENCE platform.
Common pitfalls of a file management-based system include:
- Inconsistent file naming conventions across different projects
- Duplicate files (including Toolbox components)
- Duplicate file locations and folders
- Non-native CAD files, imported into SOLIDWORKS, are linked to and missing
- Parts and assemblies have unused or outdated configurations
To prepare for a successful move to 3DEXPERIENCE, you will need careful planning and preparation to ensure all files are checked and any issues resolved ahead of saving. Several tools are available to help you prepare SOLIDWORKS files for migration:
- SOLIDWORKS File Utilities – Rename, replace, and move files
- Pack and Go – Gather and organize all related files
- File Preparation Assistant – Detect and fix issues
- Task Scheduler – Refresh the file set ready for upload
Moving SOLIDWORKS Files to the 3DEXPERIENCE platform
The Collaborative Designer for SOLIDWORKS and 3DEXPERIENCE SOLIDWORKS roles provide two options for moving SOLIDWORKS content that resides in a Windows folder structure. It’s important that you understand the capabilities of each, and utilize the one that best fits your requirements.
Interactive Save from SOLIDWORKS to the 3DEXPERIENCE platform
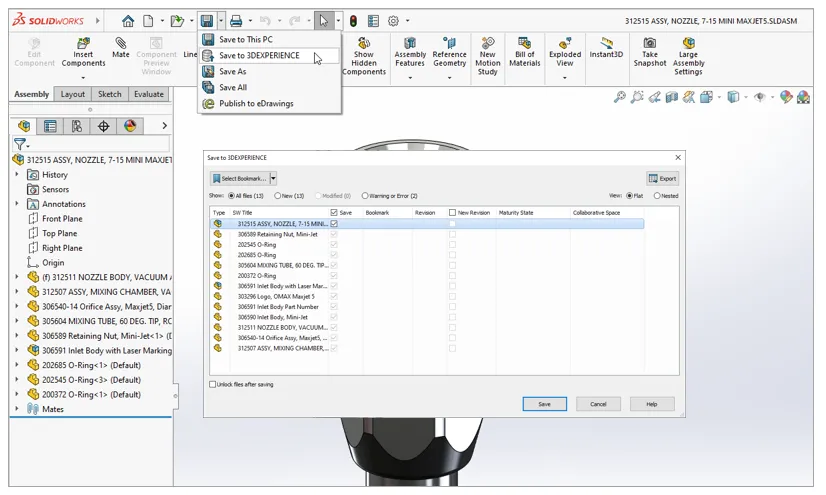
The Save to 3DEXPERIENCE command is the regular save option available from both the SOLIDWORKS File menu and the MySession Task Pane. This is an interactive save command that securely uploads SOLIDWORKS files and creates corresponding SOLIDWORKS items in your chosen Collaborative Space.

Note: To increase performance when saving large data sets, the interactive save can be configured to run asynchronously. When asynchronous save is enabled in MySession options, the save to 3DEXPERIENCE operation will run in the background enabling the user to continue working in their SOLIDWORKS session.
Interactive save from SOLIDWORKS is suited to uploading single file sets one at a time.
Batch Save to the 3DEXPERIENCE platform
The Batch Save to 3DEXPERIENCE tool is available from the SOLIDWORKS Tools menu. This is an automated, asynchronous tool that has the same secure upload capability as the Save to 3DEXPERIENCE command. It provides the ability to save SOLIDWORKS files from multiple folders into various Collaborative Spaces and Bookmarks in a single operation.
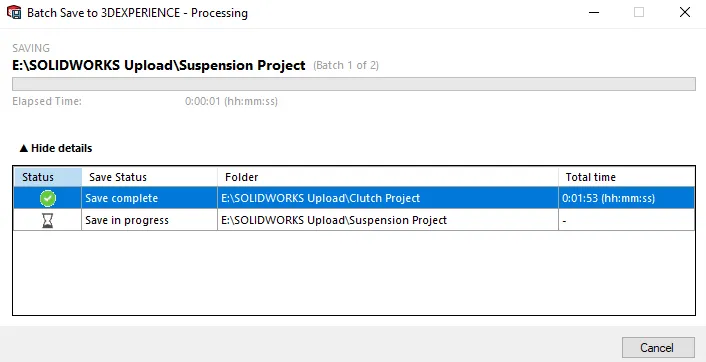
The Batch Save utility is suited to large data sets that contain multiple projects with a data size of less than 5 GB. Once a Batch Save is underway, the tool will run asynchronously in the background, enabling you to continue working in your SOLIDWORKS session.
For an in-depth overview and detailed best practices, please refer to the SolidPractices guide titled Moving SOLIDWORKS Files to the 3DEXPERIENCE Platform.

Worried you have a larger amount of data to migrate? Contact you SOLIDWORKS reseller for a best path forward.
Next Steps
For a full explanation of the platform configuration check out this learning path.

Share & Markup 101
You’re ready to say goodbye to cumbersome email attachments, and we’re ready to teach how Cloud Services make it possible.

Store & Revise 101
You’ve seen one too many files overwritten and lost to collaboration void, and you’re ready to learn how Cloud Services can help.

Manage & Control 101
You’d prefer if your change action forms weren’t buried in a filing cabinet, and are interested in a new normal.
How Can We Help You?

Activate
Ready to dive into Cloud Services? You’re just a few small steps away from activation. Let us walk you through them.

Learn
Want to learn more about the tools? Dedicated resources for each are waiting for you. Learn more about them now.

Try It Out
You’ve seen enough, and are ready to embark on your Cloud Services journey. Log into your 3DEXPERIENCE and follow the steps.